Best Drinks and Their Locations in Black Myth: Wukong
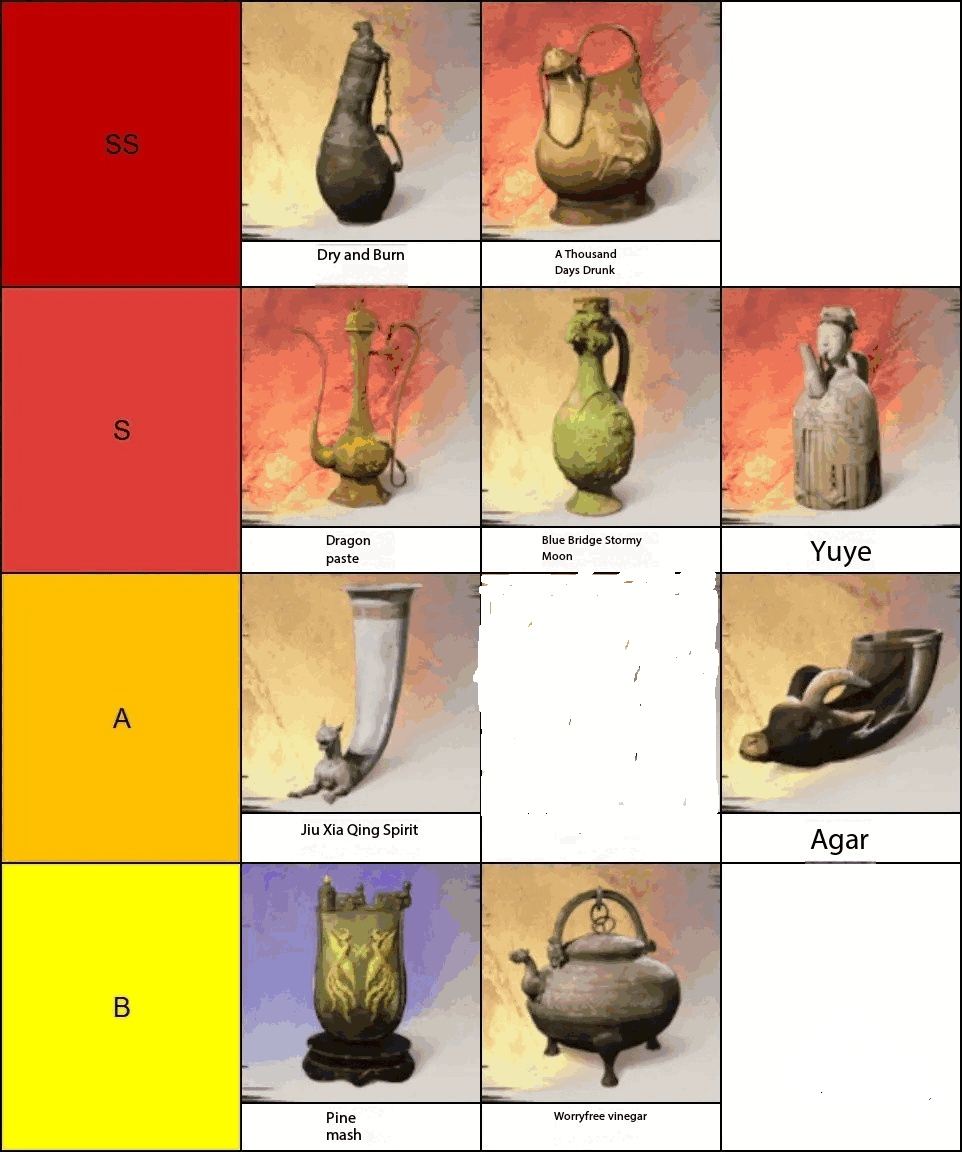
In “Black Myth: Wukong,” I categorize the beverages into four tiers based on their effects: SS, S, A, and B. The SS tier includes Dry and Burn, and Thousand-Day Drunk; the S tier includes Dragon Paste, Blue Bridge Wind and Moon, and Jade Liquid; the A tier includes Nine Mist Clear Brew and Crystal Nectar; and the B tier includes Pine Brew and Worry-Free Brew. Below, I will introduce them in the order they appear.
Coconut Liquor – Jade Essence
Usage Effect:
Each sip restores 33% to 55% of the current maximum health.
Attributes:
At maximum level, it has three slots.
Acquisition:
Initially available and can be upgraded at the Shen Monkey.
Recommended Combinations:
- Pure Bottle Willow Leaf + Peak Mountain Stone Core + Purple Patterned Garnet
- Tiger Relic + Suo Luo Crystal Bud + Suo Luo Crystal Bud
- Wisdom Orchid + Yaochi Lotus Seed + Yaochi Lotus Seed
Rating:
Coconut Liquor – Jade Essence is a highly balanced and versatile liquor with excellent effects after upgrading. Although upgrading from Coconut Liquor to Jade Essence requires a significant amount of “Three Winter Worms,” if the number of slots is not a major concern, considering upgrading to the higher restoration quantity of Lamb Brew is an option. Despite not being the best choice, Coconut Liquor has no obvious flaws and is rated as S-tier.

Lamb Brew – Dry and Burn
Usage Effect:
Each sip instantly restores 20% to 18% of the current maximum health. It then continuously restores 25% to 48% of health over a short period.
Attributes:
At maximum level, it has two slots.
Acquisition:
Found at the initial position of Yellow Wind Ridge, along the right side of the mountain path. “Lamb Brew” can be upgraded to “Dry and Burn.”
Recommended Combinations:
- Purple Patterned Garnet + Suo Luo Crystal Bud
- Poison Thorn + Gallbladder Pearl
Rating:
The continuous restoration effect is a double-edged sword: it effectively avoids debuffs from items like the Wonderful Immortal Gourd and Poison Set, but it may be overwhelmed by fast damage in high-difficulty multiple rounds due to slower recovery and fewer slots. The recommended combinations help minimize the risk of being defeated quickly. Overall, despite its drawbacks, it is rated as SS-tier.

Blue Bridge – Wind and Moon
Usage Effect:
Each sip restores 36% of the current maximum health. Slightly increases movement speed.
Attributes:
At maximum level, it has three slots.
Acquisition:
Located on the north shore of the Bitter Sea. Proceed along the path to the Shen Dragon, and after passing through the temple gate, it can be found in the middle of the lake.
Recommended Combinations:
- Everlasting Vine + Double Crown Blood + Poison Thorn
- Wisdom Orchid + Double Crown Blood + Poison Thorn
Rating:
Blue Bridge – Wind and Moon is a liquor specifically designed for map traversal. When combined with Poison Thorn, Traveler Set, Wind Bell, Centipede, and Breath Exchange, it greatly enhances movement speed. The three slots provide ample combination options, and pairing it with Everlasting Vine also replenishes stamina, facilitating faster movement and avoiding some attacks. Overall, Blue Bridge – Wind and Moon performs exceptionally well and is rated as S-tier.

Thousand Days Drunk
Usage Effect:
Each sip restores 60% of the current maximum health. However, it causes the character to stagger briefly due to intoxication.
Attributes:
At maximum level, it has three slots.
Acquisition:
Available for purchase at Shen Monkey after clearing Flame Mountain.
Recommended Combinations:
- Wisdom Orchid + Yaochi Lotus Seed + Yaochi Lotus Seed
- Pure Bottle Willow Leaf + Wisdom Orchid + Peak Mountain Stone Core
- Tiger Relic + Suo Luo Crystal Bud + Suo Luo Crystal Bud
Rating:
Thousand Days Drunk offers an extremely high health restoration amount. As long as you use rolling actions while drinking, you can cancel the staggering effect caused by intoxication. Although it requires some operational skill, the substantial recovery makes it a strong choice, similar to the Clear Treasure Gourd. Despite the slightly troublesome operation, its high recovery rate still earns it an SS-tier rating.

Fine Nectar
Usage Effect:
Each sip restores 36% of the current maximum health. Also restores a small amount of mana.
Attributes:
At maximum level, it has two slots.
Acquisition:
Found in a chest behind the tower next to the Elder Ginseng in the Sinful Tower Forest of Bliss Valley in Little Western Heaven.
Recommended Combinations:
- Turtle Tears + Peak Mountain Stone Core
- Turtle Tears + Yaochi Lotus Seed
Rating:
Fine Nectar is one of the few methods for mana recovery, but its necessity diminishes in multiple rounds. It works well with Turtle Tears, but Turtle Tears requires full health to activate. Frequent use of Fine Nectar provides additional opportunities for spell casting. However, its health recovery is relatively low, and it has only two slots, thus rated as A-tier.

Pine Liquor
Usage Effect:
Each sip restores 35% of the current maximum health. If health is above half, drinking it also increases stick strength.
Attributes:
At maximum level, it has two slots.
Acquisition:
Available for purchase at Shen Monkey after defeating Huang Mei.
Recommended Combinations:
- Iron Bone Silver Ginseng + Yaochi Lotus Seed
Rating:
Pine Liquor has limited combination options. It is of low value unless you haven’t found a better liquor or “Three Winter Worms” by the end of Chapter 3. Therefore, Pine Liquor is only suitable for transitional stages, rated as B-tier.

Carefree Elixir
Usage Effect:
Each sip restores 30% of the current maximum health. When health is critically low, it significantly increases the recovery amount.
Attributes:
At maximum level, it has two slots.
Acquisition:
Found in a small temple after obtaining the Scorpion Prince’s Essence in the Flower Bridge of the Spider Cave.
Recommended Combinations:
- Purple Patterned Garnet + Iron Bullet
- Purple Patterned Garnet + Wisdom Orchid
Rating:
Carefree Elixir is suitable for providing extra recovery in life-threatening situations, but due to high Boss damage, trying to trigger additional recovery by lowering health can easily lead to defeat. Even when additional recovery is triggered, its effect is not as strong as Thousand Days Drunk or Jade Essence, and it has fewer slots, only two. Overall, it is rated as B-tier.

Nine Mists Clear Elixir
Usage Effect:
Each sip restores 35% of the current maximum health. Provides a certain amount of vitality.
Attributes:
At maximum level, it has three slots.
Acquisition:
Found in the back room on the left after passing through the door in the Golden Light Courtyard of the Yellow Flower View in Spider Ridge.
Recommended Combinations:
- Tiger Relic + Wisdom Orchid + Everlasting Vine
- Wisdom Orchid + Yaochi Lotus Seed + Yaochi Lotus Seed
Rating:
Nine Mists Clear Elixir is suitable for use when enemies are difficult to approach and vitality is low. It helps in releasing magical treasures or transformation abilities. When combined with the Golden Body Set and Falcon Monk’s Essence, it can restore crucial vitality when facing high-resilience Bosses. Despite its lower recovery amount and limited use, it performs well overall, rated as A-tier.

Dragon Balm
Usage Effect:
Each sip restores 30% of the current maximum health. Increases the damage of the next attack.
Attributes:
At maximum level, it has four slots.
Acquisition:
Found on a table after defeating the Flame Mountain Landlord in the Verdant Cloud Palace of Flame Mountain – Red Furnace Valley.
Recommended Combinations:
- Wisdom Orchid + Yaochi Lotus Seed + Suo Luo Crystal Bud + Suo Luo Crystal Bud
- Wisdom Orchid + Twelve Floors Heavy Glue + Tiger Relic + Tiger Relic
Rating:
Dragon Balm has the most slots of any liquor in the game. Combined with the Universal Herb in the Root Instrument, it can restore up to 46% of health. As a functional liquor, it stands out for enhancing attack damage. If Thousand Days Drunk is cumbersome to operate and Dry and Burn has insufficient slots, Dragon Balm is undoubtedly a better choice. Overall, it performs excellently and is rated as S-tier.


